Host immich in LXC with iGPU passthrough
After trying several self-hosted photo services, I finally settled down with immich. While it is quick and easy to set up immich with docker, I have always been trying to run it directly inside an LXC. The main reason is hardware acceleration. You can run docker inside a privileged LXC (which is discouraged) or a VM. Correct me if I am wrong, but if you pass the GPU to the VM, you can no longer pass it to other LXCs, which is apparently a deal breaker. Thanks to the hard work by GitHub user loeeeee, which largely formed the foundation of this post.
Install
loeeeee have already developed a good writeup on how to set up the LXC, so
here I will simply add a few things that could mess up or be improved.
Python version on Ubuntu
As of now, Ubuntu LTS (24.04) is shipped with Python 3.12 by default. For
hardware acceleration with you iGPU, you need the
openvino package from Intel. At this moment, immich only
supports onnxruntime-openvino=0.18.0. As you can see from
pypi, this version is only built for Python 3.11. This means
you either install Python 3.11 yourself for immich or build the wheel yourself
for Python 3.12. Apparently, the first approach is more cost effective.
On a my daily driver, I would definitely use conda to manage Python versions,
but it just seems to be too much hassle for a server. I decided to install
Python though apt.
The following commands expects you to run in root and you likely will.
add-apt-repository ppa:deadsnakes/ppa
apt update
apt install python3.11 python3.11-venv python3.11-dev
ln -sf /usr/bin/python3.11 /usr/bin/python3
Note that we are overwriting the default Python version of the system to make our life easier. This change will be reverted back later.
GPU passthrough
There are lots of posts online regarding this part. In short, this process requires bind mounting of devices related to the iGPU and id mapping. However, I did struggle a lot initially when doing the id mapping stuff, so I guess it does not hurt to have one more post to explain this.
Here is my id mapping for the immich LXC running on Ubuntu 24.04 (i.e., very likely this mapping will for you out of box as well if you using Ubuntu from Proxmox’ official template).
lxc.cgroup2.devices.allow: c 226:0 rwm
lxc.cgroup2.devices.allow: c 226:128 rwm
lxc.mount.entry: /dev/dri dev/dri none bind,optional,create=dir
lxc.idmap: u 0 100000 65536
lxc.idmap: g 0 100000 43
lxc.idmap: g 44 44 1
lxc.idmap: g 45 100045 55
lxc.idmap: g 100 100 1
lxc.idmap: g 101 100101 892
lxc.idmap: g 993 103 1
lxc.idmap: g 994 100994 64541
The idea of id mapping could be quite confusing. To be honest, I struggled quite a lot in the beginning. But here is my summarization for what you should do
The key part for id mapping is that you need map all groups (or users) on the LXC from 0 to 65535 to the host’s user or group ids. No repetitions or gaps are allowed, but you have the freedom to chop the whole range into how many segments you want. The mapped id on the host side does not have to consecutive, as long as different ranges have no overlap.
For iGPU passthrough, you need to map the group owning
/dev/dri/card0and/dev/dri/renderD128on the host to the same group ids inside the LXC. This will “chop” the whole range into segments and you need to apply the principles we have talked about above.
For example, on my host, the /dev/dri looks like this
> ls -l /dev/dri
total 0
drwxr-xr-x  3 root root        100 Aug 12 22:41 .
drwxr-xr-x 22 root root       5.4K Aug 15 23:29 ..
drwxr-xr-x  2 root root         80 Aug 12 22:41 by-path
crw-rw----  1 root video  226,   0 Aug 12 22:41 card0
crw-rw-rw-  1 root render 226, 128 Aug 12 22:41 renderD128
You can see that we have to map the video group to my LXC’s video group and
the render group to my LXC’s render group.
Next, by looking up /etc/group on both sides, we can see that we need the
following mappings.
graph LR
    subgraph LXC
        L1[video, 44]
        L2[render, 993]
    end

    subgraph Host
        H1[video, 44]
        H2[render, 103]
    end

    L1 --> H1
    L2 --> H2

    style H1 fill:#2980b9,stroke:#333,stroke-width:2px
    style H2 fill:#d35400,stroke:#332,stroke-width:2px
    style L1 fill:#2980b9,stroke:#333,stroke-width:2px
    style L2 fill:#d35400,stroke:#333,stroke-width:2px
This corresponds to the following lines in the id mapping.
lxc.idmap: g 44 44 1
lxc.idmap: g 993 103 1
I additionally did a group mapping for the user group (100), which I have
forgot why, but presumably due to some permission issues on file handlings.
After the key part of mapping is determined, all you have to do it two fill in the rest of the gid’s to make sure there is no gaps or overlaps. Especially, from here, you can see that the id’s on the host do not have to be consecutive.
lxc.idmap: g 993 103 1
lxc.idmap: g 994 100994 64541
Pre-install (new from v1.139.2)
If you use GitHub workflow approach (even my build or fork your own), you can
skip most of part of the script, as all dependencies will be built and packed by
Github Actions. Just run dep-ubuntu.sh manually and install_ffmpeg,
install_postgresql, change_locale, and add_runtime_dependency functions
from pre-install.sh. Check out this part on how to
install the packages. If you go with this and build the server yourself, make
sure download and install the packages before running install.sh.
Build and install immich
Again, just follow loeeeee’s readme. One thing to note, after the
installation, you need to change the default Python version back to 3.12, as
the python-apt package is needed for apt to work properly, but installing it
for Python 3.11 is rather complicated.
To keep the ML part of immich working, we need explicitly tell immich-ml to use
python 3.11. Assume you have installed immich to the default location
/home/immich, run the following commands as immich user (not root):
ln -sf /usr/bin/python3.11 /home/immich/app/machine-learning/venv/bin/python
ln -sf /usr/bin/python3.11 /home/immich/app/machine-learning/venv/bin/python3
ln -sf /usr/bin/python3.11 /home/immich/app/machine-learning/venv/bin/python3.11
Now switch back to root and change the default Python version back to 3.12.
ln -sf /usr/bin/python3.12 /usr/bin/python3
Build the server automatically with GitHub Actions
Now, this is the part that I am really want to talk about. If you have followed
the setup guide, you will find how tedious it is. Even worse, you have to
manually bump up the immich version in install.env, run install.sh, wait for
many minutes for the building to finish. EVERY SINGLE TIME when there is a new
release.
Does it sound bad to you? It does to me. So I wrote a GitHub workflow to
automatically build the server with openvino (so iGPU for ML) upon a new
immich release is detected, pack the server app and the reversed geo coding
part geodata, and publish a release. The workflow is triggered everyday around
10 PM EST or manually by you. You can find the workflow here.
Apart from saving the efforts of building the server manually, as (in principle) every major version since v1.133.0 (I had not developed the workflow before this point) has been built and published in my repo, restoring to any previous version is as easy as downloading the release and unpacking it. This is especially useful if you want to roll back to a previous version for whatever reason.
You can of course directly download my release here, and simply
unpack it with the immich user
cd /home/immich
wget -O server.tar.gz "https://github.com/tautomer/immich-in-lxc/releases/latest/download/server.tar.g
mv app app.old
mv geodata geodata.old
tar -xf server.tar.gz
rm server.tar.gz
However, there is catch. To build the server, an environment variable
$UPLOAD_DIR has to be passed to the workflow, which is crucial if you use
immich to handle the assets themselves. As I completely use external libraries
sitting on my NAS’ NFS share /mnt/photos, I simply linked the upload directory
(which will appear on the installed server as /home/immich/app/upload) to
/mnt/photos/.immich. This will 100% percent break for you, so you have to link
it to your own upload directory.
ln -sf /your/upload/path /home/immich/app/upload
Again, run this with the immich user, not root.
Alternatively, you can also fork my repo and do your own release.
New from version v1.139.2
Starting from version v1.139.2, the dependency building performed in
pre-install.sh is also included in the release. The additional
dependencies.tar.gz file contains the five packages built (libjxl,
libheilf, libraw, imagemagick, and libvips) in GNU stow
format and their versions stored in json files.
If you have used the pre-install.sh script to build the dependencies, you need
remove the installed libraries first.
-
If you still have the makefiles, you can head to
immich-in-lxc/image-sourcefolder, and run the corresponding uninstall command for each library. They usecmake,makeorninjato install, so you can look up the corresponding uninstall command. -
If you have not kept the makefiles, things are a bit more complicated. You can use compare the files in
/usr/localagainst the files in the stowed version manually to determine which files should be removed. Make sure you back things up first, i.e., move these files, rather thanrm. I do have a script that can assist with this process. It worked for me, but use it at your own risk. If your LXC is a dedicated one for immich, you should be fine.
To do this, first download the dependencies.tar.gz file with root from the
release and extract it to your desired location.
tar -xf dependencies.tar.gz --no-same-owner -C /tmp
Next, if you are already using the stowed version, we will back it up first and uninstall them.
mv /opt/stow /opt/stow.old
if [ "$(ls -A /opt/stow.old)" ]; then
    cd /opt/stow.old
    for lib in $(ls -d */); do
        stow -q -D -t /usr/local "${lib%/}"
    done
    ldconfig
fi
Then, we will install the new dependencies.
shopt -s dotglob
mv /tmp/deps/stow/* /opt/stow/
shopt -u dotglob
cd /opt/stow
for lib in $(ls -d */); do
    stow -S -t /usr/local "${lib%/}"
done
ldconfig
After thi, you can fire the server up and see if it works.
- If the server can run without issues, you can remove the old stowed version.
rm -rf /opt/stow.old - Otherwise, you can restore the old stowed version by running
cd /opt/stow
for lib in $(ls -d */); do
    stow -D -t /usr/local "${lib%/}"
done
rm -rf /opt/stow
mv /opt/stow.old /opt/stow
cd /opt/stow
for lib in $(ls -d */); do
    stow -S -t /usr/local "${lib%/}"
done
ldconfig
If you want to build the server yourself
To build the server yourself, you need to fork my repo and set up a few repo secrets and variables.
- First, fork my repo (of course….)
- Head to your GitHub settings for personal access tokens
-
Generate a fine-grained personal access token for your fork
your-github-username/immich-in-lxcwith the read and write permissions ofActionsandVariables.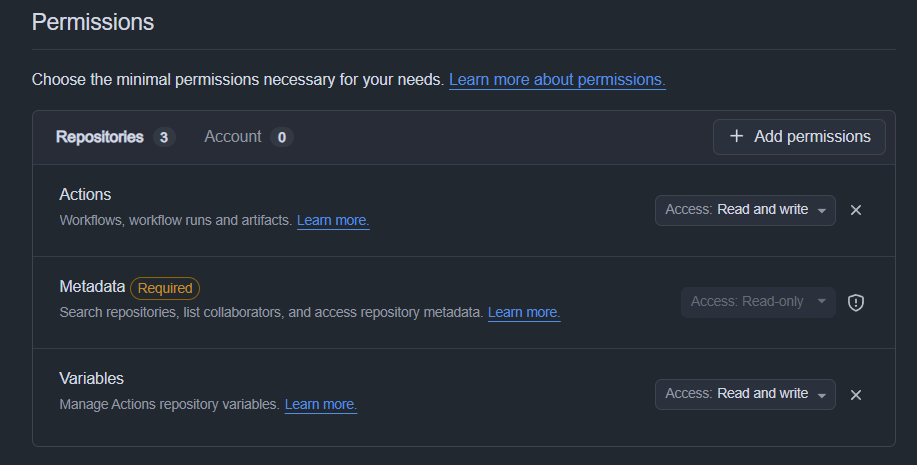
- Copy the token and add it to your fork’s repo secrets as
ACTIONS_PAT. Note that, this step is in your fork settings, not your account settings.https://github.com/your-username-here/immich-in-lxc/settings/secrets/actions - Next, add repo variables. The tab is next to the secrets tab. Add the
following variables:
UPLOAD_DIR: The upload directory for immich, which is the same as the one you linked to/home/immich/app/uploadabove.LATEST_IMMICH_RELEASE: The latest immich release version that the workflow has built. This is NOT the version you want to build. Just leave it blank, as it will be handled automatically by the workflow. The workflow will grab this value and compare it with the latest official immich release. If the immich version is newer than this value, a new version will be built and released, and this variable will be automatically updated to the new version.
- Wait until the workflow finish building. You can then download the release
from your fork. And drop-in replace the
appandgeodatadirectories in your current server. - Optionally, update the dependencies following the instructions above.
Automatically update immich from the LXC
To make the update process easier, I wrote a script that can be run inside the LXC to automatically update immich to the latest version with cron. This script runs around 10:45 PM EST every day, and checks if there is a new immich. As our GitHub workflow runs around 10 PM EST and takes about 20 minutes to finish building, this script will always be able to find the latest immich release if there is an update that day.
- Create a script as root. For example, I have
/root/check_latest_immich_server.sh. Two things to note here:- Make sure you use your own fork in the
GITHUB_REPOvariable. If you use my release, make sure you add one line in the script to properly configure the upload directory after the server is extractedtar -xf server.tar.gz. - If you have email relay setup, change the
ADMIN_EMAILvariable to your own email address. If you do not have email relay setup, you can simply remove the email sending part in the script. If you want to set up a centralized mail relay, you can follow my post here.
#!/bin/bash set -e # Configurable settings LOG_LINES=30 GITHUB_USERNAME=your-github-username ADMIN_EMAIL="your@email.com" WEB_LOG_FILE="/var/log/immich/web.log" ML_LOG_FILE="/var/log/immich/ml.log" LOCK_FILE="/home/immich/pinned" timestamp() { date '+%Y-%m-%d %H:%M:%S'; } strip_ansi() { sed -r "s/\x1B\[[0-9;]*[mK]//g"; } send_success_email() { { echo "Subject: immich upgraded to $LATEST_TAG" echo "To: $ADMIN_EMAIL" echo echo "Immich successfully upgraded from $PREV_TAG to $LATEST_TAG." echo echo "Please double-check the server to ensure everything is running smoothly." } | sendmail -t } send_failure_email() { ML_LOG=$(tail -n "$LOG_LINES" "$ML_LOG_FILE" | strip_ansi || echo "No ML log available") WEB_LOG=$(tail -n "$LOG_LINES" "$WEB_LOG_FILE" | strip_ansi || echo "No Web log available") { echo "Subject: immich upgrade FAILED to $LATEST_TAG" echo "To: $ADMIN_EMAIL" echo echo "Immich upgrade FAILED from $PREV_TAG to $LATEST_TAG." echo echo "Please review the logs below and take corrective actions." echo echo "=== Last $LOG_LINES lines of ML log ===" echo "$ML_LOG" echo echo "=== Last $LOG_LINES lines of Web log ===" echo "$WEB_LOG" } | sendmail -t } # Argument parsing for --tag flag MANUAL_TAG="" for arg in "$@"; do if [[ $arg == --tag=* ]]; then MANUAL_TAG="${arg#*=}" fi done echo "[INFO] $(timestamp) - Starting Immich update check" PREV_TAG=$(cat /home/immich/prev_tag 2>/dev/null || echo "") # Pinning logic if [ -f "$LOCK_FILE" ] && [ -z "$MANUAL_TAG" ]; then PINNED_TAG=$(cat "$LOCK_FILE") echo "[INFO] $(timestamp) - Version is pinned to $PINNED_TAG. Automatic updates are disabled. To override, use the --tag flag." exit 0 fi # Determine target version if [ -n "$MANUAL_TAG" ]; then LATEST_TAG="$MANUAL_TAG" echo "[INFO] $(timestamp) - Manual upgrade requested for tag: $LATEST_TAG" # A new manual tag overrides any existing pin sudo -u immich rm -f "$LOCK_FILE" else LATEST_TAG=$(curl -s https://api.github.com/repos/$GITHUB_USERNAME/immich-in-lxc/releases/latest | jq -r '.tag_name') #Version comparison for auto-update ver_latest="${LATEST_TAG#v}"; ver_local="${PREV_TAG#v}" if dpkg --compare-versions "$ver_latest" le "$ver_local"; then echo "[INFO] $(timestamp) - No newer release (latest: $LATEST_TAG, local: $PREV_TAG)" exit 0 fi fi echo "[INFO] $(timestamp) - New version $LATEST_TAG found. Stopping services..." sudo systemctl stop immich-web immich-ml # Conditionally handle dependencies DEPENDENCIES_UPDATED=false STOW_TEMP_DIR=$(mktemp -d) echo "[INFO] $(timestamp) - Checking for dependency package..." if wget -q -O "$STOW_TEMP_DIR/dependencies.tar.gz" "https://github.com/$GITHUB_USERNAME/immich-in-lxc/releases/download/$LATEST_TAG/dependencies.tar.gz"; then DEPENDENCIES_UPDATED=true echo "[INFO] $(timestamp) - New dependency package found. Starting update..." # Unstow and backup old dependencies if [ -d "/opt/stow" ] && [ "$(ls -A /opt/stow)" ]; then cd /opt/stow for lib in $(ls -d */); do sudo stow --verbose=0 -D -t /usr/local "${lib%/}" done cd - > /dev/null sudo ldconfig sudo mv /opt/stow /opt/stow.old else sudo rm -rf /opt/stow sudo mkdir -p /opt/stow.old fi sudo mkdir -p /opt/stow # Extract and restructure new dependencies tar -xf "$STOW_TEMP_DIR/dependencies.tar.gz" -C "$STOW_TEMP_DIR" --no-same-owner > /dev/null 2>&1 if [ -d "$STOW_TEMP_DIR/deps/stow" ]; then shopt -s dotglob sudo mv $STOW_TEMP_DIR/deps/stow/* /opt/stow/ shopt -u dotglob # TODO: we want to do a package-level handling of the stowed packages whichi will need buil-lock.json fi if [ -f "$STOW_TEMP_DIR/deps/json/build-lock.json" ]; then sudo mv $STOW_TEMP_DIR/deps/json/build-lock.json /opt/stow/ fi # Stow new dependencies if [ -d "/opt/stow" ] && [ "$(ls -A /opt/stow)" ]; then cd /opt/stow for lib in $(ls -d */); do sudo stow --verbose=0 -S -t /usr/local "${lib%/}" done cd - > /dev/null sudo ldconfig fi else echo "[INFO] $(timestamp) - No dependency package found for this release. Skipping." fi rm -rf "$STOW_TEMP_DIR" echo "[INFO] $(timestamp) - Replacing immich server..." sudo -u immich bash <<EOF set -e cd /home/immich mv app app.old mv geodata geodata.old wget -q -O server.tar.gz "https://github.com/$GITHUB_USERNAME/immich-in-lxc/releases/download/$LATEST_TAG/server.tar.gz" tar -xf server.tar.gz > /dev/null 2>&1 rm server.tar.gz EOF # Fire up the server echo "[INFO] $(timestamp) - Starting services..." sudo systemctl start immich-web immich-ml echo "[INFO] $(timestamp) - Waiting 30s for services to stabilize..." sleep 30 if systemctl is-active --quiet immich-web && systemctl is-active --quiet immich-ml; then # Success send_success_email echo "[INFO] $(timestamp) - Removing backups..." sudo -u immich bash <<EOF cd /home/immich rm -rf app.old geodata.old echo "$LATEST_TAG" > prev_tag EOF if [ "$DEPENDENCIES_UPDATED" = "true" ]; then sudo rm -rf /opt/stow.old fi # If a manual tag was used, create the lock file if [ -n "$MANUAL_TAG" ]; then echo "$LATEST_TAG" | sudo -u immich tee "$LOCK_FILE" > /dev/null echo "[INFO] $(timestamp) - Version pinned to $LATEST_TAG. Automatic updates disabled." fi echo "[INFO] $(timestamp) - Update completed successfully." else # Failure echo "[ERROR] $(timestamp) - One or more services failed to start." send_failure_email echo "[INFO] $(timestamp) - Restoring previous version..." sudo systemctl stop immich-web immich-ml # Conditional rollback of dependencies if [ "$DEPENDENCIES_UPDATED" = "true" ]; then if [ -d "/opt/stow" ] && [ "$(ls -A /opt/stow)" ]; then cd /opt/stow for lib in $(ls -d */); do sudo stow --verbose=0 -D -t /usr/local "${lib%/}" done cd - > /dev/null fi sudo rm -rf /opt/stow sudo mv /opt/stow.old /opt/stow if [ -d "/opt/stow" ] && [ "$(ls -A /opt/stow)" ]; then cd /opt/stow for lib in $(ls -d */); do sudo stow --verbose=0 -S -t /usr/local "${lib%/}" done cd - > /dev/null fi sudo ldconfig fi # Rollback server sudo -u immich bash <<EOF cd /home/immich rm -rf app geodata mv app.old app mv geodata.old geodata EOF sudo systemctl restart immich-web immich-ml echo "[INFO] $(timestamp) - Restore complete." fi - Make sure you use your own fork in the
- Make the script executable
chmod +x /root/check_latest_immich_server.sh - Add a cron job to run the script every day at 10:45 PM EST. You can use the
following command to add it to your crontab:
echo "45 2 * * * /root/check_latest_immich_server.sh >> /var/log/cron_immich_update.log 2>&1" | crontab -Note that the time is in UTC, so you need 2:45 AM UTC to get 10:45 PM EST.
This script will check if there is a new immich release, and if so, it will stop
the immich services, download the latest immich server release, extract it, and
start the services again. If either service fails for whatever reason in 30s,
it will send an email to you with the last 30 lines of the ML and web logs, and
restore the previous version of the server. If the services start successfully,
it will send an email to you with the success message and remove the old server
files. If you want to change the number of lines sent, simply change the
LOG_LINES variable at the top of the script.
This will make sure you always have a working immich server, even if the latest automatic build fails for some reason.
Conclusion
With this setup, you can now run immich directly inside an LXC with iGPU passthrough. You can also enjoy the convenience of automatic updates with GitHub Actions. This setup is not only more efficient but also allows you to utilize the hardware acceleration capabilities of your iGPU for machine learning tasks and transcoding. If you have any questions or suggestions, feel free to reply here or open an issue in my fork or loeeeee’s upstream repo (I do check his repo from time to time).
Originally published on April 10, 2025.Home Lab Self-hosted immich LXC Sysadmin Devops