SSL certificate and LAN domain resolution with AdGuard Home and Nginx Proxy Manager
If you are like me, running home lab stuff, but do not expose these services to the public, you probably have encountered similar problems as me,
- SSL certificate warnings show up everywhere,
- port numbers makes 0 sense and you cannot remember,
- a bunch of docker containers running on the same host with the only difference being the port (how do you even distinguish them), etc.
I have been thinking of solving this problem once for all, but to be honest, I was not very clear what to do exactly.
Recently, I spent some time googling and experimenting around. Finally, I got it working with AdGuard Home serving as the local DNS server and Nginx Proxy Manager as the reverse proxy.
Indeed, there has been a ton of tutorials on this online, but I still struggled a lot when trying to set it up. I think the issue is that unless you know what to do, you will not even know what/how to google. As a result, I think it is still meaningful for me to write this whole thing down. As least, it can be a good reminder on how to replicate this process for myself.
A brief introduction to my setup
Due to the fact that I wanted to save as much money as possible when building my home lab, the whole setup might seem to be dumb and lacking of redundancy. Redundancy is indeed a big problem for me, but hey, we are not in the production environment anyway. As long as I do not lose data, it is not unacceptable to leave with the problems for a few years. I will probably rebuild a better setup when the current hardware is too old to be useful.
In short, I use a Proxmox Virtual Environment as the host for almost everything, including
- an OpenWrt VM currently running OpenWrt 23.05.2 as the main router
- an XPEnology (a hack way to install synology DSM on any x86 hardware) as the file server
- a Nextcloud for syncing files with my phone and Memories as the photo gallery
- an unprivileged Debian VM as the docker host for many docker containers, like
- a obico server to auto-detect failures in my 3D prints
- a UnblockNeteaseMusic to bypass some restrictions of Chinese media streaming services
- a Jellyfin LXC container for media streaming
- a Windows 10 VM for something that has to be done with Windows
and many more.
The goal is to get rid of all the SSL certificate warnings for my own servers and directly access them without the need of a port number. The approach is as follows.
- Get a public domain name. To save money, I use dynu’s free DDNS service.
- Use
Nginx Proxy Manager (NPM)to get a certificate for the domain. - Use
NPMto redirect all your servers to a subdomain of the public domain, for example,nextcloud.domain.tld->nextcloud.lan:443. - Use
AdGuard Homeas a LAN DNS server to redirect all traffic to*.domain.tldto yourNPMwithout going through a public DNS resolver.
Procedure
Install AdGuard Home
Initially, I installed AGH as a LXC container on my PVE host, using the script provided here. This approach is easier to maintain, but later I decided to move the installation to my OpenWrt VM. Unlike a physical router, the soft router has effectively unlimited RAM and ROM anyway.
There is already an excellent tutorial from OpenWrt. You just have to follow it from the beginning to the end, with a couple of things to note.
- Before installing AGH, I had been giving the OpenWrt VM 256 MB RAM without an issue. However, when I was configuring AGH through the web portal, the whole VM crashed a few times when I clicked the “save” button. Since the VM just crashed instantly, I did not get too much information on what happened. I suspected it was an OOM issue, so I just gave it 284 MB RAM instead, and the problem never showed up again.
- You do not have to follow the reverse proxy, ipset, and iptables section.
-
Following the tutorial, your router itself will not be able to access WAN. To solve this issue, add a line in your
/etc/adaguardhome.yamllike thisdns: bind_hosts: - 127.0.0.1 - 192.168.1.1 port: 53Note the added
192.168.1.1(or whatever LAN IP address you use for your router). -
The default data AGH data folder is at
/var/adguardhomewhich is not persist. Query logs and statistics will be lost upon reboot. This is mainly for the sake of a hardware router where you have a flash ROM, so a lot of writing to the ROM should be avoided and free space is likely an issue as well. However, for a soft router, neither is a problem. You can move the data to a more persist directory, for example,/opt/adguardhome. To do so, simply stop the serviceservice adguardhome stopand copy the data directory
cp /var/adguardhome /optthen modify AGH’s working directory
sed -i 's/var/opt/g' /etc/config/adguardhomefinally restart AGH
service adguardhome start
Get a public domain
Of course, you can pay for a fancy domain for yourself, but I would like to save the money for a meal, so I chose dynu. Note that there are a whole lot free DDNS providers. You may get better experience with some other DDNS services.
To do this, follow these steps.
- Register an account, then you will see a page like this
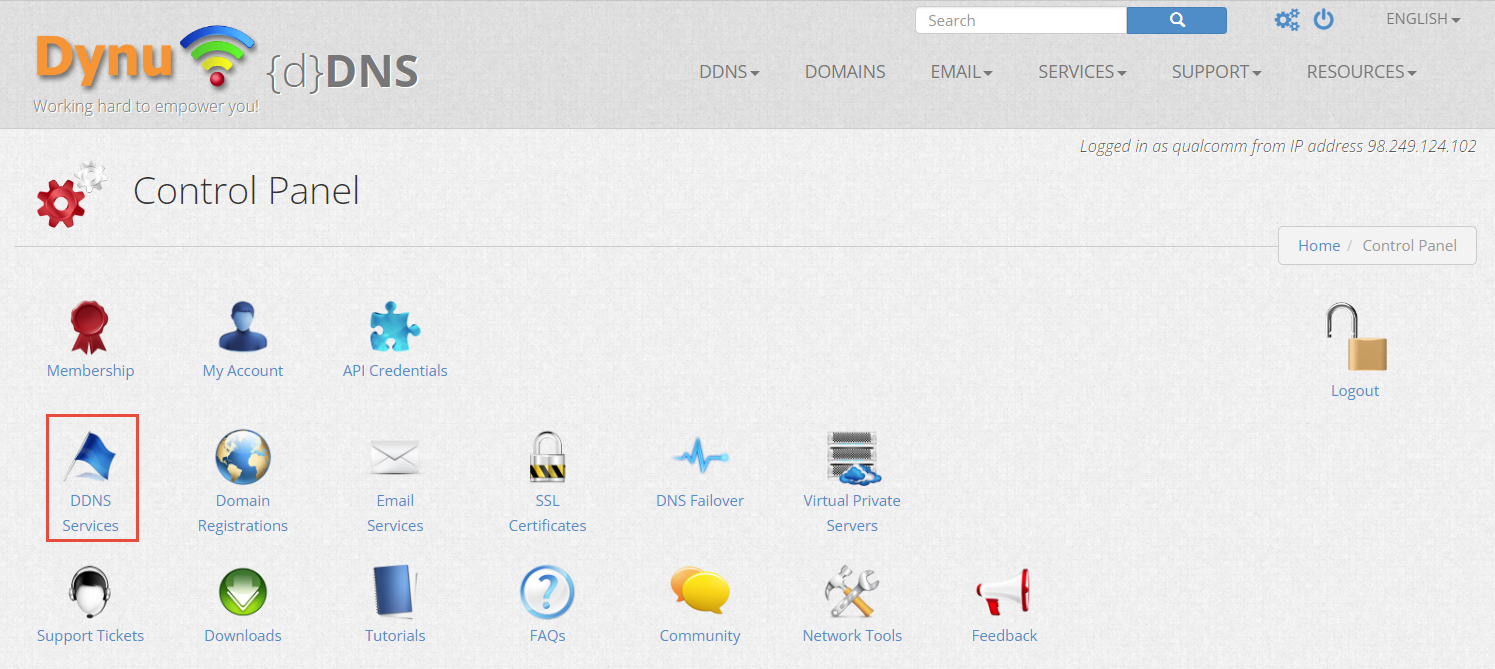
- Go to
DDNS Servicesand choose a host name and a top-level domain (TLD)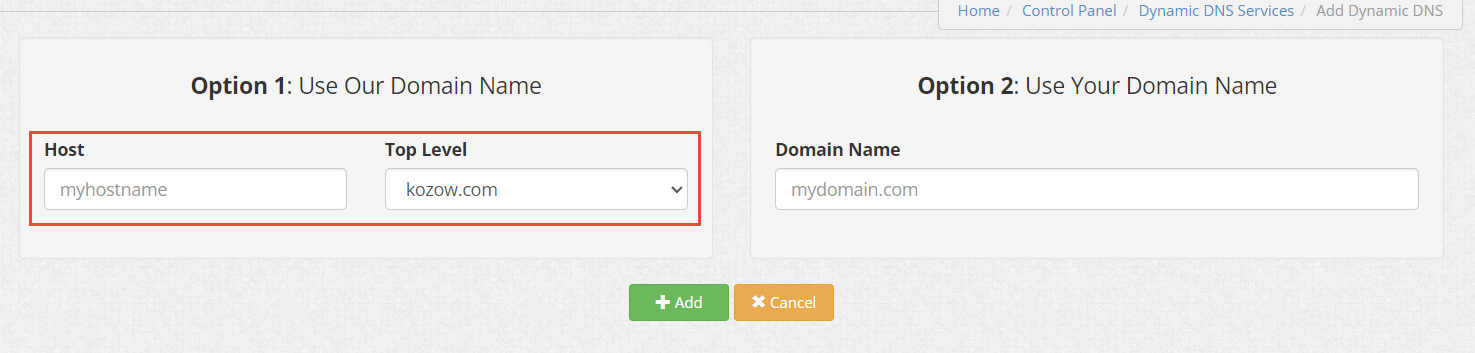
- Then, in principle, your public IP will directly be filled and you are all
set. Of course, you can play with the options, but the default will work
just fine. However, if you do not have a public IP address or it changes
over time, you need some other tricks to bypass it. I will refer you to
Google.
Install Nginx Proxy Manager
Again, you can either use the official docker
image,
but I chose to use a LXC container. Again, the script is provided by
tteck. Follow the prompt from the script and
every thing should be fine. Just note that you can have your port 80 and 443
open to get certified, but with the DNS challenge way, you do not have to. If
you are planning to or already exposed your services to WAN, your port is open
anyway. However, if you are like me who do not want to deal with the outside
world, the DNS challenge way is way better.
To do it, you might have to install Python packages first. The tool bundled in
NPM to get certificate is the popular certbot. As far as I know, supported DNS
providers bundled with it are limited. Others are supported through 3rd party
packages, like dynu. I will use dynu as an example.
- Log in to the LXC container by
sshorlxc-attachfrom PVE. - Install
certbot-dns-dynuviapip install certbot-dns-dynu.
Create a certificate with Let’s Encrypt
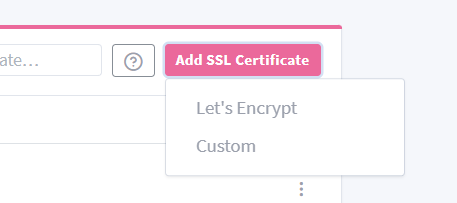
Then go back to NPM’s web portal and head to the “SSL Certificates” tab. Then
click Add SSL Certificate and choose Let's Encrypt.
Next type your domain name, email (if not the one you use for NPM management)
and tic Use a DNS chanllenge.
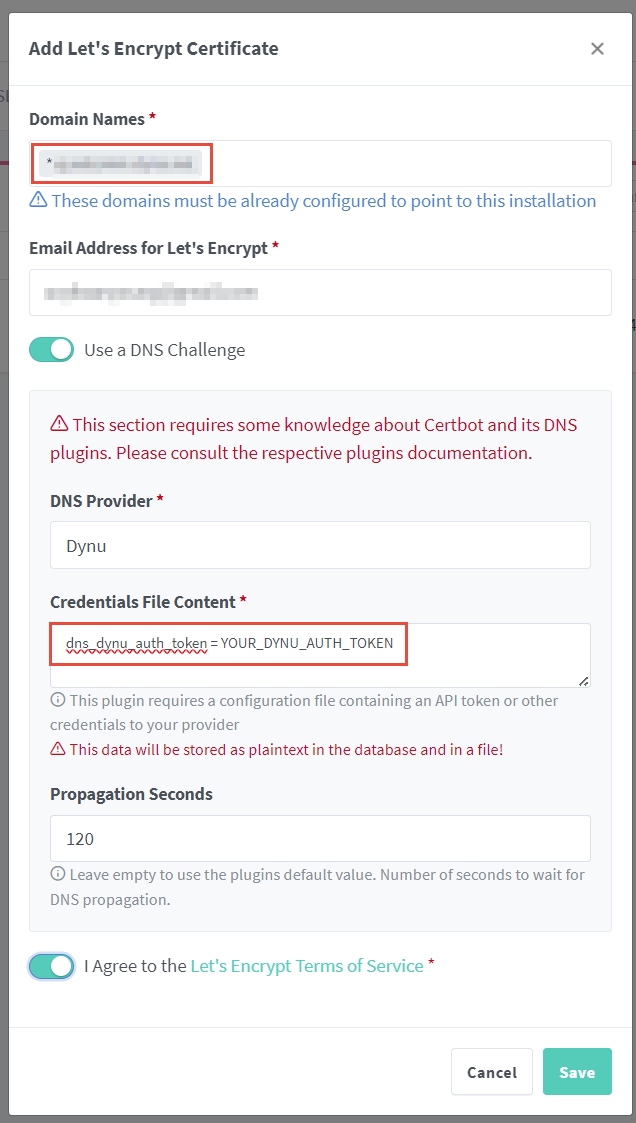
A few things to note.
- I used a wildcard in the
Domain Namesbox, such that the certificate will work on any subdomains under the domain name. You can, of course, type several domain names manually. -
Choose your DNS provider and obtain a token from there and paste in the
Credentials File Contentbox. Paste generated token afterdns_dynu_auth_token=.
- The default
propagation secondsfrom the package can be too small. As such, it is wise to fill in something bigger, for example, 120 seconds.
Then click Save. Wait for a couple seconds and you should get a valid
certificate for *.domain.tld which is good for 3 months. certbot should be
able to auto-renew the certificate, but I am not exactly sure at this moment.
If everything is fine, you should see something like the snapshot below.

Set up reverse proxies
Next we want to assign a human-friendly subdomain name to our services.
- Click
Host>Proxy Hosts.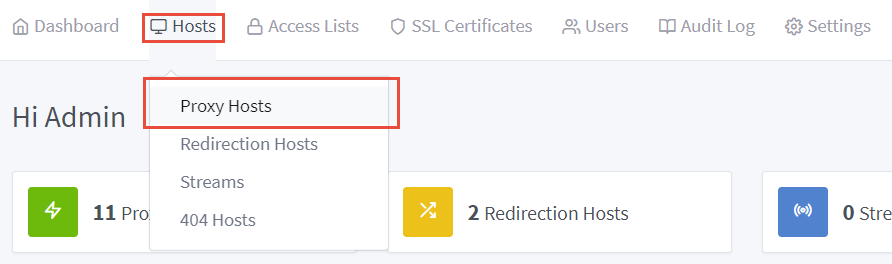
- From there, click
Add Proxy Hoston the top right corner of the UI. - In ths dialog, fill in necessary information.
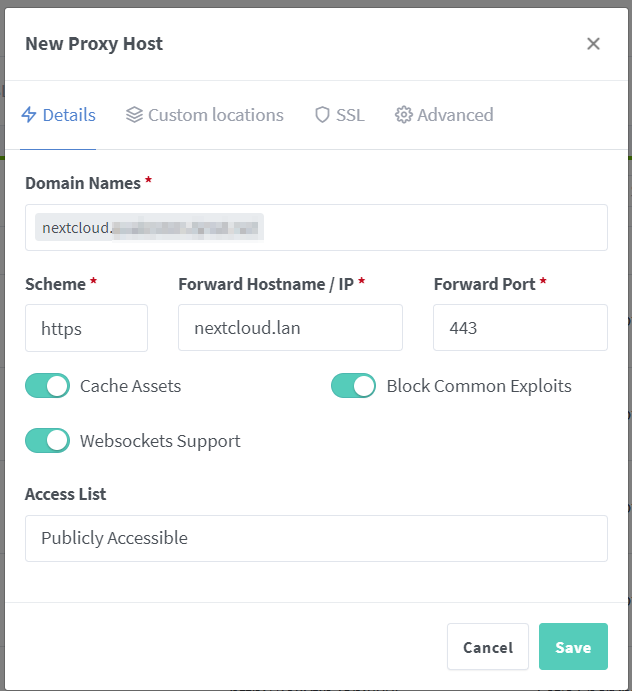 For example, I will have
nextcloud.domain.tldas my subdomain for the Nextcloud server.Forward HostnameandForward Portwill be whatever value for you Nextcloud installation. The options below are all optional. You can experiment with them, but I did see people mentioning that enabling websockets could help the loading time with your server. ForAccess List, sine we are not exposing the server to the public, it does not really matter.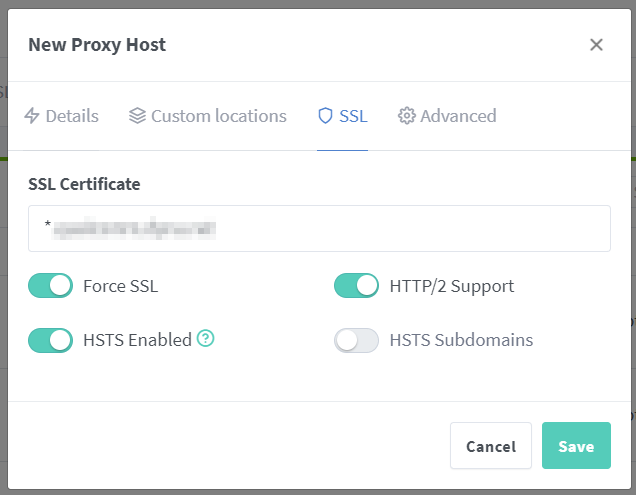 In this tab, choose the
certificate we just created in the dropdown list. Be careful with the
In this tab, choose the
certificate we just created in the dropdown list. Be careful with the Force SSLoption. For servers that are strictly non-encrypted (only listen to port 80), checking this option will probably cause problems. For the rest, again, they should help with security or loading time in principle.
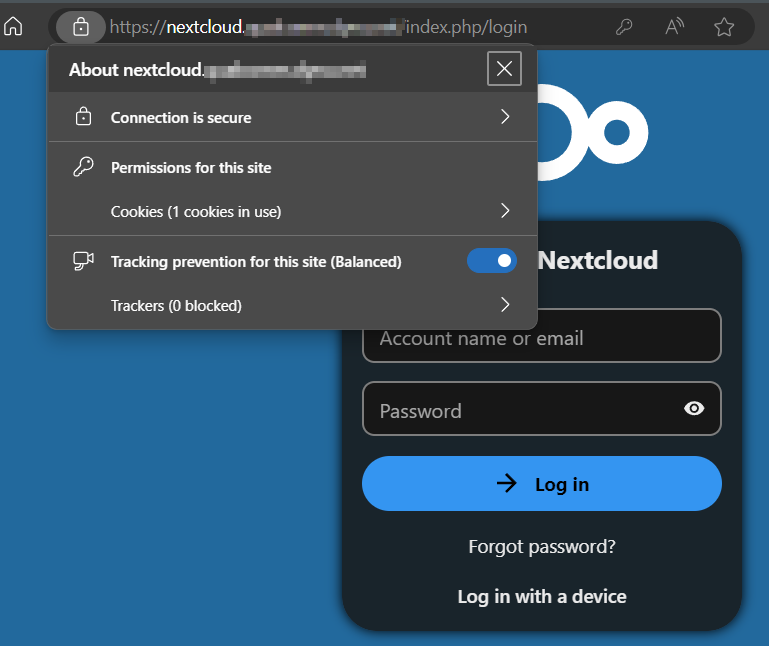
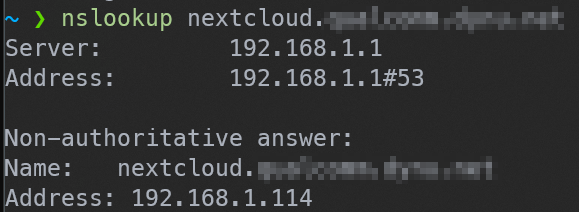
Then we are done with the reverse proxy part. However, at this moment, if you
check the DNS resolution for the subdomain, nextcloud.domain.tld, you will
find that your computer will try to reach your public IP. You can do this with
nslookup domain.tld. You will see your public IP, which means that without
opening a port on your router’s firewall, you will not be able to access
Nextcloud. This is where AGH kicks in.
Use AdGuard Home to redirect DNS resolving to Nginx Proxy Manager
If you have followed everything in installing AGH, AGH should already be your local DNS server. To make your public domain work on you local network, one last thing needs to be done.
Go to your AGH web portal and find DNS rewrites.
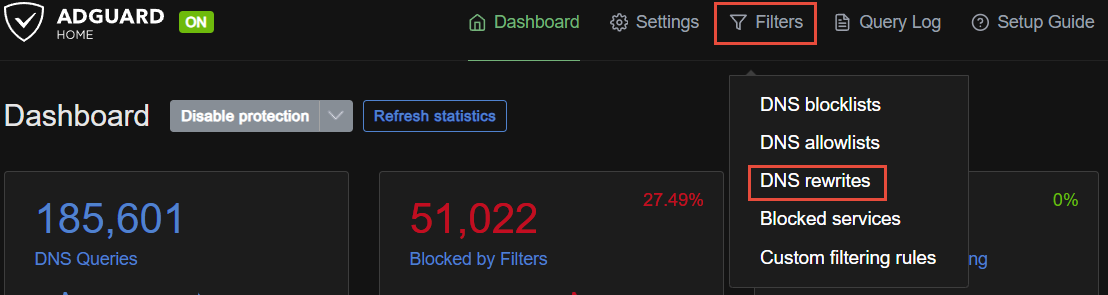
From there, Add DNS rewrites.
In the first box, fill in the domain name with a wildcard. Then in the second
box, fill in the hostname or IP of your NPM installation. After you hit Save,
go to you browser, you should be able to access your Nextcloud from the public
domain without a certificate warning.
nslookup should return your local DNS and server IP.
So now, you can do the same thing for everything else, like op.domain.tld for
your router, agh.domain.tld for your AGH, etc. All your services can be
accessed from this public domain.
Home Lab Networking Self-hosted Proxmox OpenWrt Nextcloud